
任务1
阅读my_list.h文件,有如下代码:
template<typename T>
struct node_base {
    node_base() :pre(nullptr), next(nullptr) {}
    node_iterator<T> pre;
    node_iterator<T> next;
};
// struct node
template<typename T>
struct node : public node_base<T> {
    // default constructor
    node() :val(0), node_base<T>() {}
    // used for constructing a node containing value v
    node(T v) :val(v), node_base<T>() {}
    T val;
};可以发现node_base作为基类结点,而node继承自node_base,增加了带参数的构造函数
有点反常理的是:
node_base<T> 使用 node_iterator<T> 类型的 pre 和 next
一.node_iterator
解下来就是实现struct node_iterator,这个node_iterator结构是为了使你的自定义链表可以与标准模板库(STL)的算法框架兼容。在这里,定义了迭代器的各种特性,使其能够正常工作。
1.operator++() 前置递增
self operator++() {
    if (ptr) {
        this->ptr = this->ptr->next.ptr;
    }
    return *this;
}前置递增操作符使迭代器向链表的下一个节点移动。这通常意味着将迭代器的内部指针更新为其当前节点的next指针所指向的节点。
2.operator--() 前置递减
和前置递增同理
self operator--() {
    if (ptr) {
        this->ptr = this->ptr->pre.ptr;
    }
    return *this;
}3.operator++(int) 后置递增
self operator++(int) {
    self temp = *this;
    operator++();
    return temp;
}
对于后置递增,先要把当前this对象的值存到temp中,然后执行前置递增,返回的是temp
4.operator--(int) 后置递减
和后置递增同理
self operator--(int) {
    self temp = *this;
    operator--();
    return temp;
}
二.node_const_iterator
node_const_iterator结构与前面的node_iterator非常类似,但主要区别在于它提供了对元素的只读访问,这是通过使用const关键字修饰pointer和reference类型来实现的。这意味着通过这个迭代器不能修改它所遍历到的元素的值。
具体的实现和上面的node_iterator一致,这里就不多赘述了。
三.my_list类
这个 my_list 类是一个模板类,用于实现自定义的双向链表。
1.拷贝构造函数
把一个已知的my_list对象拷贝到一个新的my_list对象中,注意这里的push_back函数是参考第267行的函数。
my_list(const my_list<T>& other) : my_list() {
    for (auto item = other.begin(); item != other.end(); item++) {
        push_back(*item);
    }
}
2.赋值预算符
赋值运算应当清除当前列表中的所有元素,然后从另一个表中复制元素
my_list<T>& operator=(const my_list<T>& other) {
    if (this != &other) {
        clear();
        for (auto item = other.begin(); item != other.end(); item++) {
            push_back(*item);
        }
    }
    return *this;
}
3.清空列表
逐个删除列表中的所有元素
void clear() {
    while (!empty()) {
        pop_front();
    }
}
4.插入元素
insert 方法在迭代器 it 指向的位置之前插入一个新元素,并返回新元素的迭代器。
方法的前六行如下图:
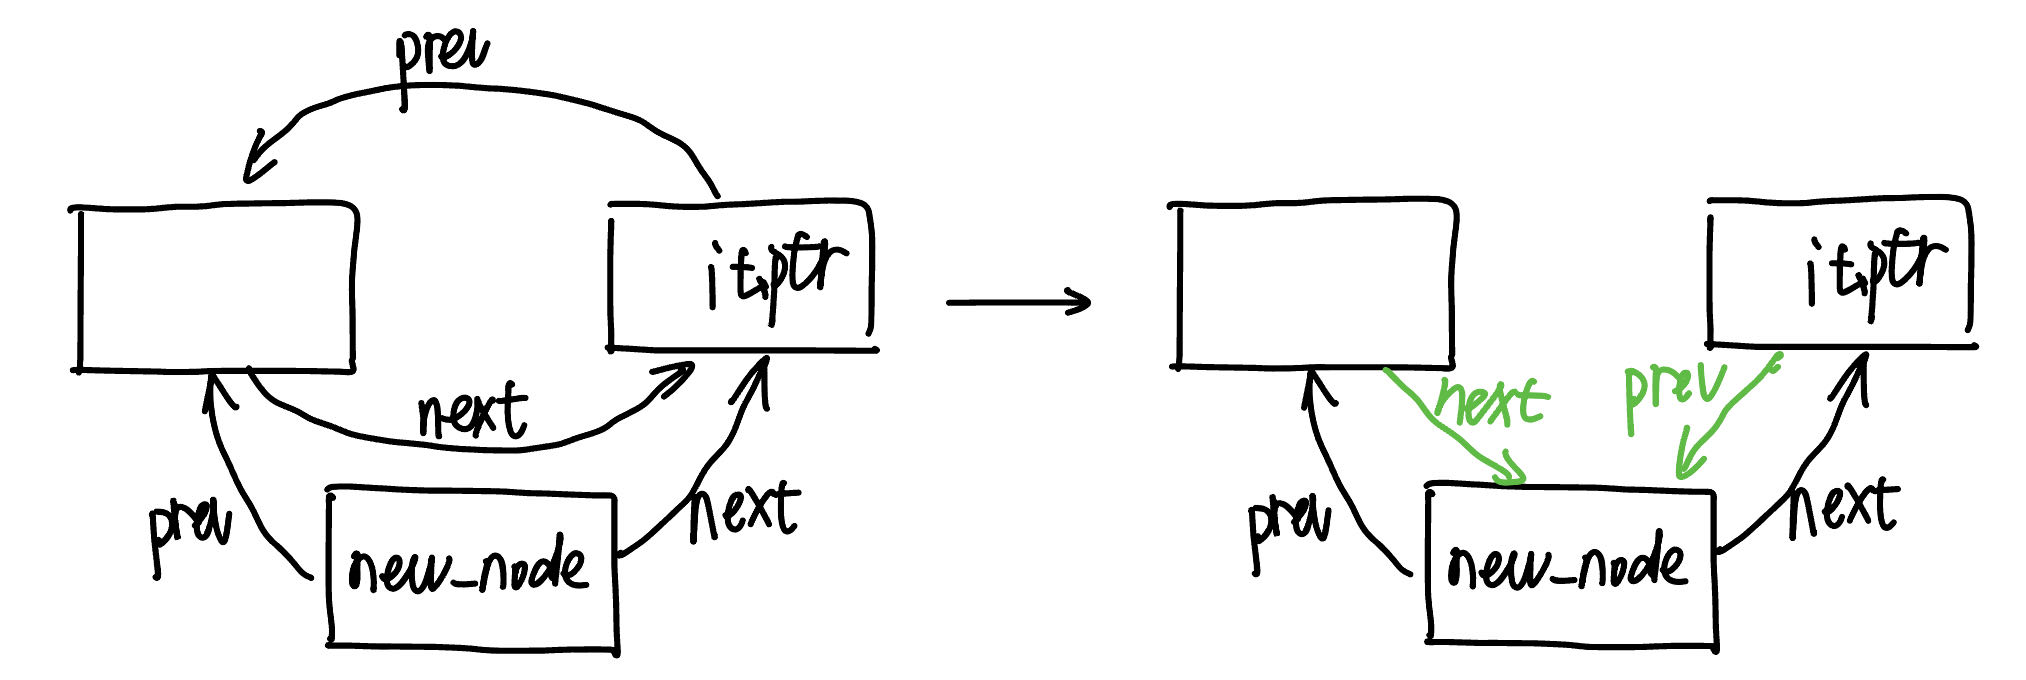
iterator insert(iterator it, const T& val) {
    node<T>* new_node = new node<T>(val);
    new_node->next = it.ptr;
    new_node->pre = it.ptr->pre;
    if (it.ptr->pre.ptr) {
        it.ptr->pre.ptr->next = iterator(new_node);
    }
    it.ptr->pre = iterator(new_node);
    if (it == begin()) {      //如果it一开始在第一个位置,那么重新设置head为new_node
        head = iterator(new_node);
    }
    ++ele_num;      //增加元素数量
    return iterator(new_node);
}
5.删除元素
erase 方法删除迭代器 it 指向的元素,并返回指向下一个元素的迭代器。
前9行如下图:
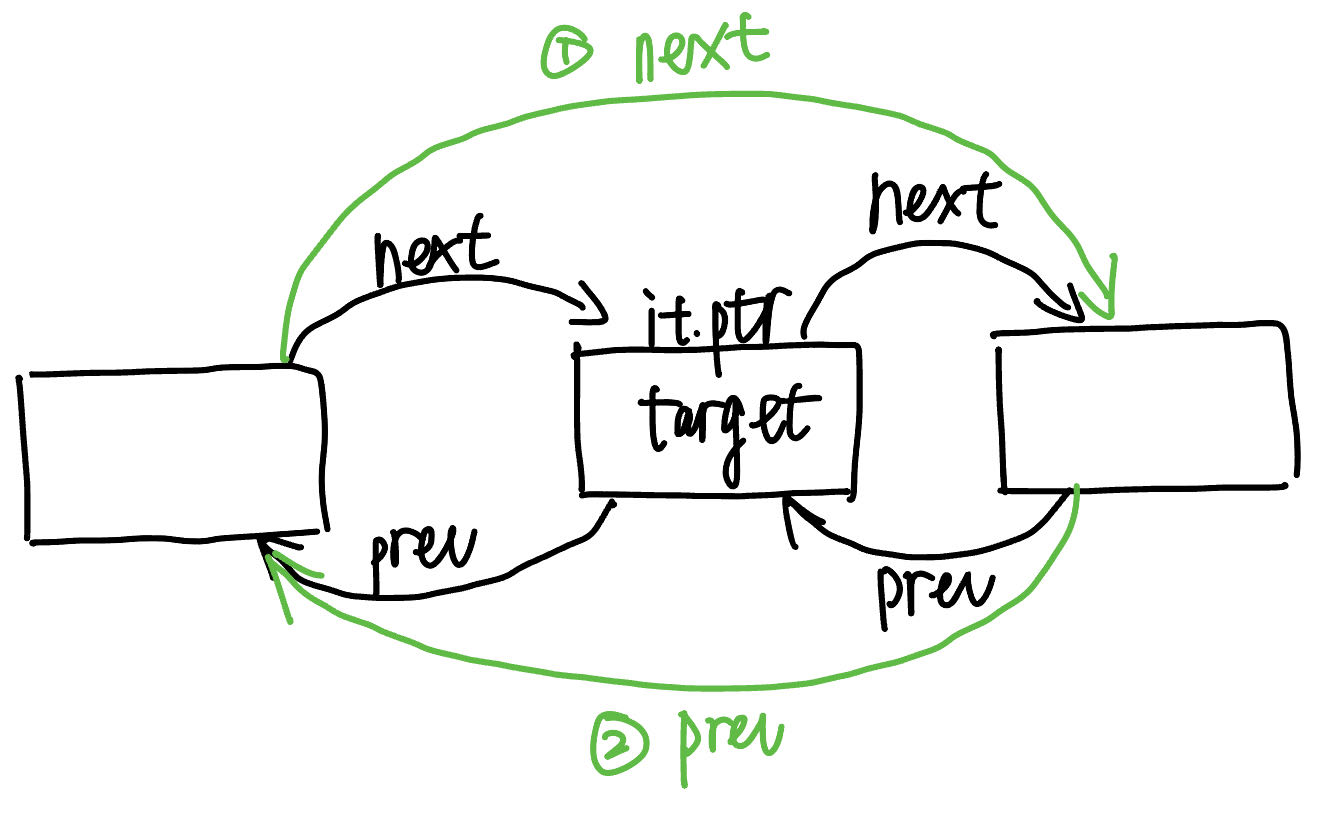
iterator erase(iterator it) {
assert(it != end());
node_base<T>* target = it.ptr;
if (target->pre.ptr) {
target->pre.ptr->next = target->next;
}
if (target->next.ptr) {
target->next.ptr->pre = target->pre;
}
if (it == begin()) { //如果删除的it是开头,那就把下一个元素作为开头
head = target->next;
}
if (it == end()) { //如果删除的it是结尾,那就把上一个元素作为结尾
tail = target->pre;
}
iterator next_iterator = target->next;
delete static_cast<node<T>*>(target);
--ele_num;
return next_iterator;
}6.列表比较
首先比较两者的长度是否相等,然后遍历每一个元素,比较是否相等
bool operator==(const my_list& other) {
    if (ele_num != other.ele_num) return false;
    auto it1 = begin();
    auto it2 = other.begin();
    while (it1 != end() && it2 != other.end()) {
        if (*it1 != *it2) return false;
        ++it1;
        ++it2;
    }
    return true;
}
任务2:Teris项目
这个项目是一个俄罗斯方块的游戏,目录结构如下:
我们首先分别解释一下各个模块的功能,
一、Block
Block.cpp和Block.h
在这个模块中主要是对方块的各种属性进行了定义
在注释中我们可以看到如下信息:
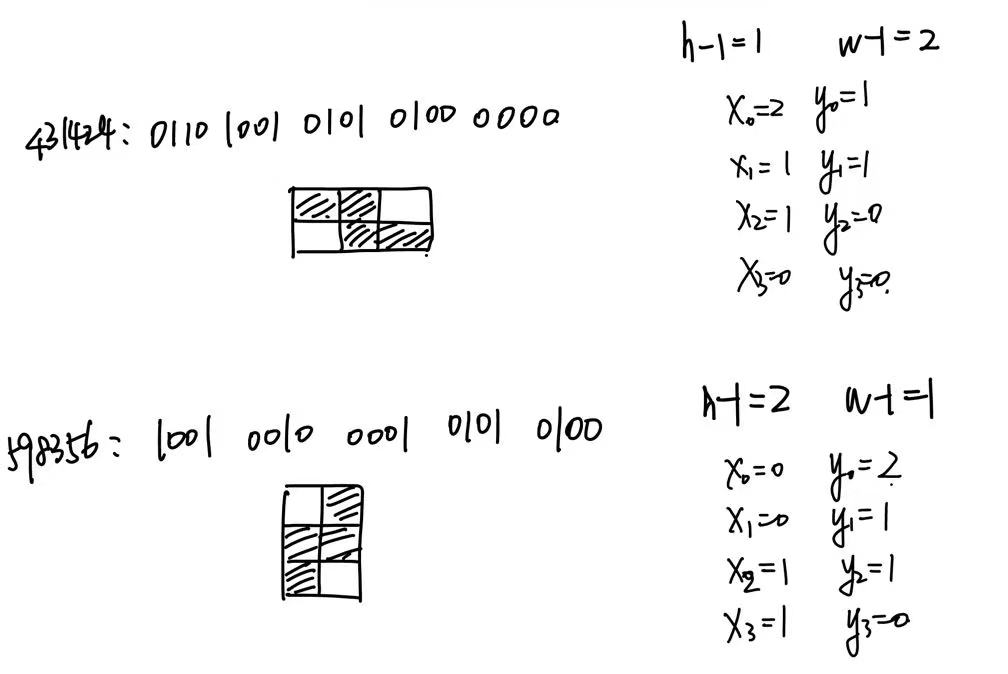
//block layout is : {h - 1, w - 1} {x0, y0} {x1, y1} {x2, y2} {x3, y3} (two bits each)
// e.g.:
// 431424: 0110 1001 0101 0100 0000 这表明方块的高度、宽度和每个小方块的位置信息都由20bits组成,h和w分别代表高度和宽度,{x0, y0}, {x1, y1}, {x2, y2}, {x3, y3}:这些坐标对代表了四个旋转方向中方块中每个小方块的位置。
具体示例如下图:
第一个方法是move方法:
bool Block::move(const Dir& direction) {        //成功移动了一格返回false,被阻止是返回true
    switch (direction) {
    case DOWN:
        if (checkCollision(m_x, m_y + 1))
            return true;
        m_y++;      //向下移动一格
        break;
    case LEFT:
        if (!checkCollision(m_x - 1, m_y))
            m_x--;      //向左移动一格
        break;
    case RIGHT:
        if (!checkCollision(m_x + 1, m_y))
            m_x++;      //向右移动一格
        break;
    }
    return false;
}枚举三个方向的值,有DOWN、LEFT和RIGHT,在每次移动时都由碰撞检测。注意这个方法成功移动了一格返回false,被阻止是返回true
第二个方法是draw方法,这也是你要完成的
第三个方法是clear方法:
这个方法的功能是在游戏的画布上清除方块的图形表现。具体来说,它用于清除方块当前所占的位置,以便方块可以移动到新的位置而不留下图像的痕迹,或者当方块被消除时从界面上移除方块。
void Block::clear(int leftX, int leftY) const {
    int x, y, left, top;
    for (int i = 0; i < 4; i++) {
        x = getX(i);
        y = getY(i);
        left = leftX + BLOCK_SIZE * (m_x + x);
        top = leftY + BLOCK_SIZE * (m_y + y);
        clearrectangle(left, top, left + BLOCK_SIZE, top + BLOCK_SIZE);
    }
}第三个方法是rotate方法:
这个方法不仅处理方块的旋转,还涉及到在旋转后检查并调整位置以避免方块超出游戏区域或与其他方块碰撞。
void Block::rotate() {
    int ori_ind = m_ind, ori_x = m_x;   //保存旋转前的旋转状态索引和方块的水平位置
    m_ind = (m_ind + 1) % 4;    //更新旋转索引
    while (m_x + blkWd() >= MAP_WIDTH)    //检测旋转后是否超出边界
        m_x--;
    if (checkCollision()) {     //检测是否发生碰撞,如果碰撞了就回滚
        m_ind = ori_ind;
        m_x = ori_x;
    }
}还有关于检测碰撞的方法checkCollision等等,这里不多赘述了。
以下是关于Block模块中需要实现的代码
1.getX和getY
数据获取:
int data = BLOCK_DATA[m_type][m_ind];从BLOCK_DATA数组中获取当前方块的旋转状态对应的编码数据。这里m_type表示方块的类型,m_ind表示当前方块的旋转状态(通常是0到3,代表四种旋转状态)。位移计算:
int shift = 12 - 4 * ind;根据小方块的索引计算必要的位移量,以便将所需的坐标对齐到整数的低位端。这里从整数的第12位开始向右位移,因为前4位存储的是方块的高度和宽度信息,之后的每个小方块的坐标信息占4位(x和y坐标各2位)。坐标提取:
getX(int ind)中:通过(data >> (shift + 2)) & 0x3操作提取x坐标。这里先将数据向右位移shift + 2位,+2是因为在4位坐标中,x坐标占据了后两位。然后,通过& 0x3(即与0011进行位与运算)获取最后两位,即x坐标。getY(int ind)中:通过(data >> shift) & 0x3操作直接提取y坐标。这里将数据向右位移shift位,然后同样通过& 0x3获取最后两位,即y坐标。
int getX(int ind) const {
    int data = BLOCK_DATA[m_type][m_ind];  // 获取当前方块类型和旋转状态的编码
    // 每个坐标由四位表示,且需要跳过前四位(h-1和w-1)
    int shift = 12 - 4 * ind;              // 计算向右移动的位数
    return (data >> (shift + 2)) & 0x3;    // 提取x坐标(两位)
}
int getY(int ind) const {
    int data = BLOCK_DATA[m_type][m_ind];  // 获取当前方块类型和旋转状态的编码
    int shift = 12 - 4 * ind;              // 计算向右移动的位数
    return (data >> shift) & 0x3;          // 提取y坐标(两位)
}
2.draw
void Block::draw(int leftX, int leftY) const {
// draw current block
// 遍历方块的四个小方块
for (int i = 0; i < 4; i++) {
// 获取当前小方块的相对坐标
int x = getX(i);
int y = getY(i);
// 计算当前小方块在屏幕上的绝对位置
int absX = leftX + (m_x + x) * BLOCK_SIZE;
int absY = leftY + (m_y + y) * BLOCK_SIZE;
// 设置填充颜色为当前方块的颜色
setfillcolor(COLORS[m_type]);
// 绘制填充的小方块
fillrectangle(absX, absY, absX + BLOCK_SIZE - 1, absY + BLOCK_SIZE - 1);
}
}其中leftX和leftY分别是左边界和上边界,这里的absX和absY的计算也是参考了clear函数中的方式
其中setfillcolor和fillrectangle方法是Easyx库中的函数,所以要确保引入了头文件easyx.h
3.randType
void Block::randType() {
// generate new type of block
// 随机选择方块类型
m_type = rand() % TYPE_NUM;
// 随机选择方块的旋转状态索引
m_ind = rand() % 4;
// Reset position to the top middle of the game board
m_x = (MAP_WIDTH - 4) / 2;
m_y = 0;
}注意这里的整个方块的位置x和y一开始被初始化为顶部的中间位置
二、Game
Game.h和Game.cpp
阅读Game.h我们可以获取以下信息:
游戏逻辑与界面
init():可能用于初始化游戏的设置,如图形界面等。
drawLeft() 与 drawRight():分别用于绘制游戏主界面和辅助提示界面。
checkLine():检查游戏面板上是否有满行,通常满行后需要被清除。
clearLine():清除已满的行,并可能涉及更新分数或游戏状态。
processKeyDown():处理键盘输入,控制方块移动、旋转等。
updateBlk():更新当前方块的状态,如下落等。
writeMaxScore():记录最高分数。
loop():游戏主循环,处理游戏逻辑的持续更新。
地图操作
setMap() 和 getMap():分别设置和获取地图上特定坐标的值,这通常用于记录方块的位置和状态。
时间控制
addGameTime():增加游戏时间,可能用于控制游戏难度或事件触发。
辅助尺寸计算函数
这些函数提供了界面绘制时需要的各种尺寸计算,如左侧游戏区宽高、右侧提示区宽高等。例如:
leftWidth()、leftHeight():计算游戏主面板的宽和高。
rightWidth()、rightTxtHeight()、rightBlkHeight():计算右侧提示区的相关尺寸。
windowWidth()、windowHeight():计算整个游戏窗口的尺寸。
rightX()、rightY():计算右侧提示区的位置。
私有变量
map:一个整数向量,表示游戏的地图,每个元素可能代表一个方块的占位。
score、gameTime:记录游戏分数和时间。
m_curBlk:当前操作的方块对象。
m_nextBlks:一个
my_list<Block>类型的容器,存储即将使用的方块,可以替换为标准库的list<Block>。
辅助函数
genNewBlks():生成新方块并放入
m_nextBlks。addBlkToMap():将当前方块加入地图。
drawNextBlks():绘制即将出现的方块。
1.drawLeft
核心部分就是通过getMap函数获得当前位置的方块信息,如果为0,代表这个位置是空的;如果不为0,则绘制一个方块
void Game::drawLeft() const {
// 清除旧的图形,为新的绘制做准备
clearrectangle(leftXY(), leftXY(), leftXY() + leftWidth(), leftXY() + leftHeight());
// 绘制游戏区域的外边框
rectangle(2 * MARGIN, 2 * MARGIN, leftWidth() + 2 * MARGIN, leftHeight() + 2 * MARGIN);
// 绘制地图上的所有方块
for (int y = 0; y < MAP_HEIGHT; y++) {
for (int x = 0; x < MAP_WIDTH ; x++) {
int blockType = getMap(x, y);
if (blockType != 0) { // 0 is the empty space
// 根据方块类型设置颜色
COLORREF color = Block::COLORS[blockType - 1]; // 0表示空白,而类型从1开始
setfillcolor(color);
// 计算方块在屏幕上的坐标
int startX = leftXY() + x * BLOCK_SIZE;
int startY = leftXY() + y * BLOCK_SIZE;
// 绘制一个填充的方块
solidrectangle(startX, startY, startX + BLOCK_SIZE - 1, startY + BLOCK_SIZE - 1);
}
}
}
// 绘制当前活动的方块
m_curBlk.draw(leftXY(), leftXY());
}2.clearLine
注意这个函数是从主界面的顶部开始依次向下检查,如果遇到满行就把当前上面的行整体向下移动一行(两层for循环),然后重置一下顶行(手动将顶行清空),最后根据清除的行来计算得分。
请注意:重新检查:由于行被向下移动,当前行j可能会有新的方块填充,所以使用j--来重新检查这一行。
void Game::clearLine() {
//Rewrite this function, implement the following logic:
// If (there are 1 line to clear)
// score += 10
// Else if (there are 2 lines to clear)
// score += 30
// Else if (there are 3 lines to clear)
// score += 50
// Else if (there are 4 lines to clear)
// score += 70
// NOTE: When you done this logic, please comment out
// the code after "END OF YOUR CODE"
int linesCleared = 0;
for (int j = 0; j < MAP_HEIGHT; j++) {
if (checkLine(j)) {
// 将上一行移至满行
for (int k = j; k > 0; k--) {
for (int i = 0; i < MAP_WIDTH; i++) {
setMap(i, k, getMap(i, k - 1));
}
}
// Reset the top line to empty after shift down
for (int i = 0; i < MAP_WIDTH; i++) {
setMap(i, 0, 0);
}
linesCleared++;
j--; // Recheck the same line index after rows are shifted down
}
}
// Calculate score based on number of lines cleared
switch (linesCleared) {
case 1:
score += 10;
break;
case 2:
score += 30;
break;
case 3:
score += 50;
break;
case 4:
score += 70;
break;
default:
break; // No score increment for no lines or more than 4 lines
}
}然后我们来阅读一下addBlkToMap函数
void Game::addBlkToMap() {
    int bx, by;
    for (int i = 0; i < 4; i++) {
        bx = m_curBlk.getX(i);
        by = m_curBlk.getY(i);
        setMap(m_curBlk.x() + bx, m_curBlk.y() + by, m_curBlk.type());
    }
}循环遍历每个小方块(俄罗斯方块中每个方块都由四个小方块组成),先取出每个小方块的相对位置,然后调用setMap来设置地图该位置处的方块类型
3.genNewBlks
这里只处理了如果预备方块列表为空,循环生成NEXT_BLOCK_NUM个新方块,使用Block类的构造函数和randType()方法随机设定方块类型,并添加到m_nextBlks列表中。
这里原来给出的模板有些问题,不知道是不是我理解有误,这里我重新实现了一下genNewBlks的逻辑
每次都检测当前方块是否被移动到底部(m_curBlk.moveDown()),如是,则把下一预览窗方块赋值给当前方块,并弹出在预览窗中的这个方块。
并且,当预览窗方块的数量小于3个时,产生新的方块
接下来的逻辑???
void Game::genNewBlks() {
//Generate new blocks
if (m_nextBlks.empty() || m_curBlk.moveDown()) {
// 如果当前方块被放置,将当前方块移除列表
if (m_curBlk.moveDown()) {
m_curBlk = m_nextBlks.front();
m_nextBlks.pop_front();
}
// 如果需要,添加新的方块,直到有NEXT_BLOCK_NUM个
while (m_nextBlks.size() < NEXT_BLOCK_NUM) {
Block newBlock(map);
newBlock.randType();
m_nextBlks.push_back(newBlock);
}
}
m_curBlk.setPos();
int x = MAP_WIDTH + 1;// 这里假设显示在地图右侧的适当位置
int y = rightTxtHeight() / BLOCK_SIZE + 1;// 基于右侧文字高度计算起始高度
for (auto blk : enumerate(m_nextBlks))
blk.item.setPos(x, y + 4 * int(blk.index));//每个方块下移4个单位距离以避免重叠
}4.drawNextBlks
每个方块都有一个 draw 方法,这里调用该方法来在界面上绘制方块。startX和startY是预览窗的起始位置,verticalSpacing是每个方块在预览窗的间隔,这里定为4个方块,参照上面genNewBlks()中的4 * int(blk.index)。
然后遍历m_nextBlks,把这3个方块画出来,注意在draw的时候,要减掉方块的x、y值,因为这个x和y是相对于LeftXY而言的,具体可以见draw的定义
void Game::drawNextBlks() const {
    // Draw all the elements in m_nextBlks
    int startX = BLOCK_SIZE + rightX();
    int startY = rightY() + rightTxtHeight() + BLOCK_SIZE;
    int verticalSpacing = BLOCK_SIZE * 4; // 假设每个方块垂直间距是4个方块的高度
    int index = 0;
    for (const Block& blk : m_nextBlks) {
        int blockDrawY = startY + index * verticalSpacing;
        blk.draw(startX-blk.x()*BLOCK_SIZE, blockDrawY-blk.y()*BLOCK_SIZE);
        index++;
    }
}
5.writeMaxScore
检查当前分数是否大于已有的最高分数,如是,则更新。
每次都调用write函数来更新配置信息
void Game::writeMaxScore() {
//Write max score to file, using class Configure::write
// Check if the current game score is higher than the stored maximum score
if (score > Configure::getInst()->maxScore()) {
// Update the maximum score in the Configure instance
Configure::getInst()->setMaxScore(score);
}
// Write the updated configuration to the file
Configure::getInst()->write();
}6.Configure
对于这个类,主要有读文件和写文件这两个方法
下面是读文件的实现:
其中istringstream的用法请点击这里
这里要注意的是定义两个类型的变量(fvalue和ivalue)来存储读到的值,因为RIGHT_WD_RATIO、RIGHT_TXT_HT_RATIO和RIGHT_BLK_HT_RATIO都是浮点型,其余的是整数型
Configure::Configure() {
ifstream reader(m_fileName.c_str(), ios::in);
if (reader.is_open()) {
//Read global variables from file 'config.txt'
string line;
string key;
float fvalue;
int ivalue;
while (getline(reader, line)) {
istringstream iss(line);
if (getline(iss, key, ' ')) {
if (key == "MAP_WIDTH" || key == "MAP_HEIGHT" || key == "BLOCK_SIZE" ||
key == "NEXT_BLOCK_NUM" || key == "MARGIN" || key == "MAX_SCORE") {
if (iss >> ivalue) {
if (key == "MAP_WIDTH") m_mapWidth = ivalue;
else if (key == "MAP_HEIGHT") m_mapHeight = ivalue;
else if (key == "BLOCK_SIZE") m_blockSize = ivalue;
else if (key == "NEXT_BLOCK_NUM") m_nextBlockNum = ivalue;
else if (key == "MARGIN") m_margin = ivalue;
else if (key == "MAX_SCORE") m_maxScore = ivalue;
}
}
else if (key == "RIGHT_WD_RATIO" || key == "RIGHT_TXT_HT_RATIO" || key == "RIGHT_BLK_HT_RATIO") {
if (iss >> fvalue) {
if (key == "RIGHT_WD_RATIO") m_rightWdRatio = fvalue;
else if (key == "RIGHT_TXT_HT_RATIO") m_rightTxtHtRatio = fvalue;
else if (key == "RIGHT_BLK_HT_RATIO") m_rightBlkHtRatio = fvalue;
}
}
}
}
}
else
write();
reader.close();
}行内容解析:
对于每一行,使用 istringstream 和空格作为分隔符解析出键(key)和值(value)。这里使用了 getline(iss, key, ' ') 来读取键,接着尝试从流中提取整数值(iss >> value)。
键值匹配:
根据读取的键名,将值赋给对应的成员变量。对于浮点类型的配置项(如宽度比例和高度比例),读取的整数值被转换为浮点数。
使用 if 语句来匹配键字符串并更新相应的成员变量。
最后的最后
还有一点需要注意的是:在main函数中
需要加一行随机数种子的构造,因为在上面的randType中多次构造srand,可能会因为过于频繁而产生相同的输出,达不到随机效果。因此只需要在main函数中,构造一次即可。
还有就是init函数中的路径是你的config.txt文件的绝对路径,不能只写config.txt(windows下路径间隔用\\来表示)
int main() {
Configure::init("D:\\mytju\\Teris_exercise\\config.txt");
srand(static_cast<unsigned int>(time(nullptr)));
Game game;
game.init();
game.loop();
game.writeMaxScore();
return 0;
}实验结果:
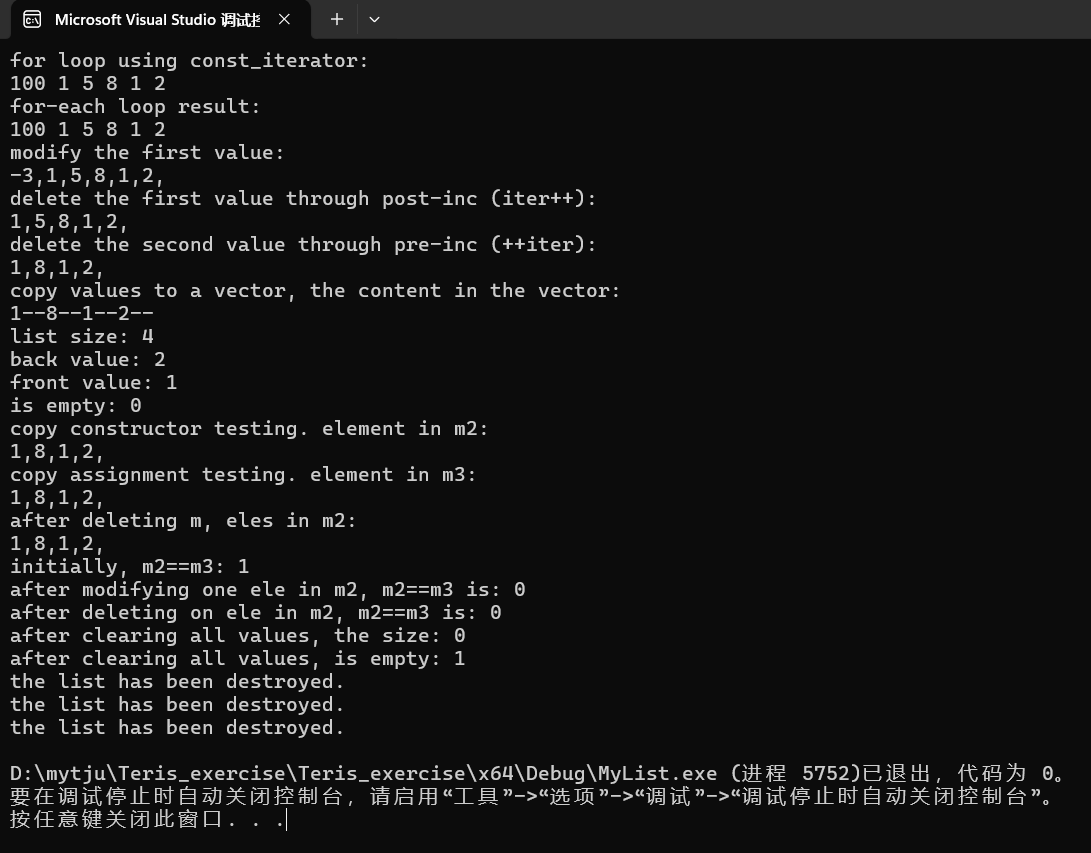
任务1:
任务2:
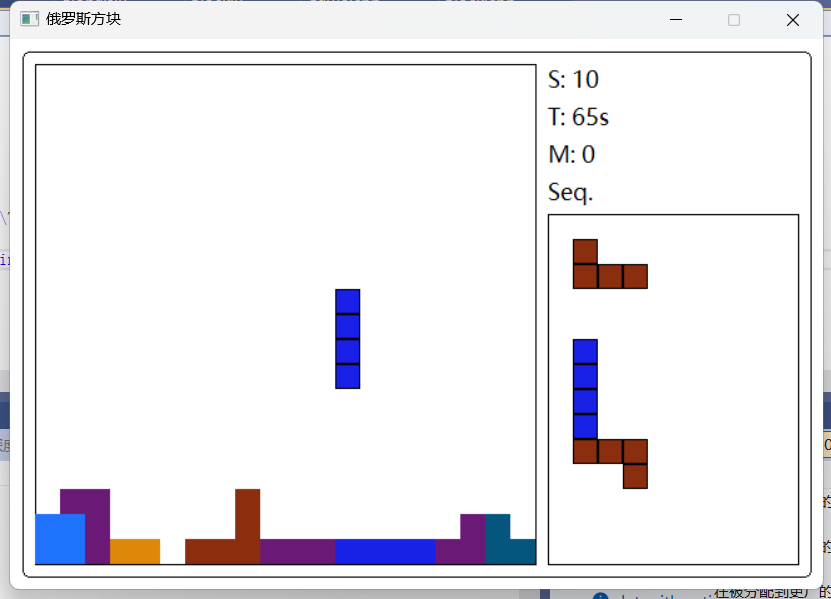
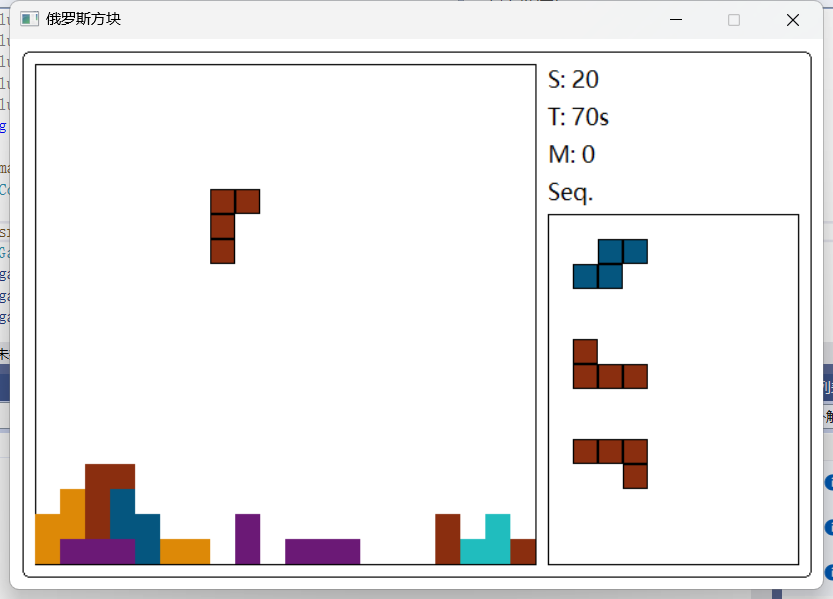
部分结果截图如下:
评论